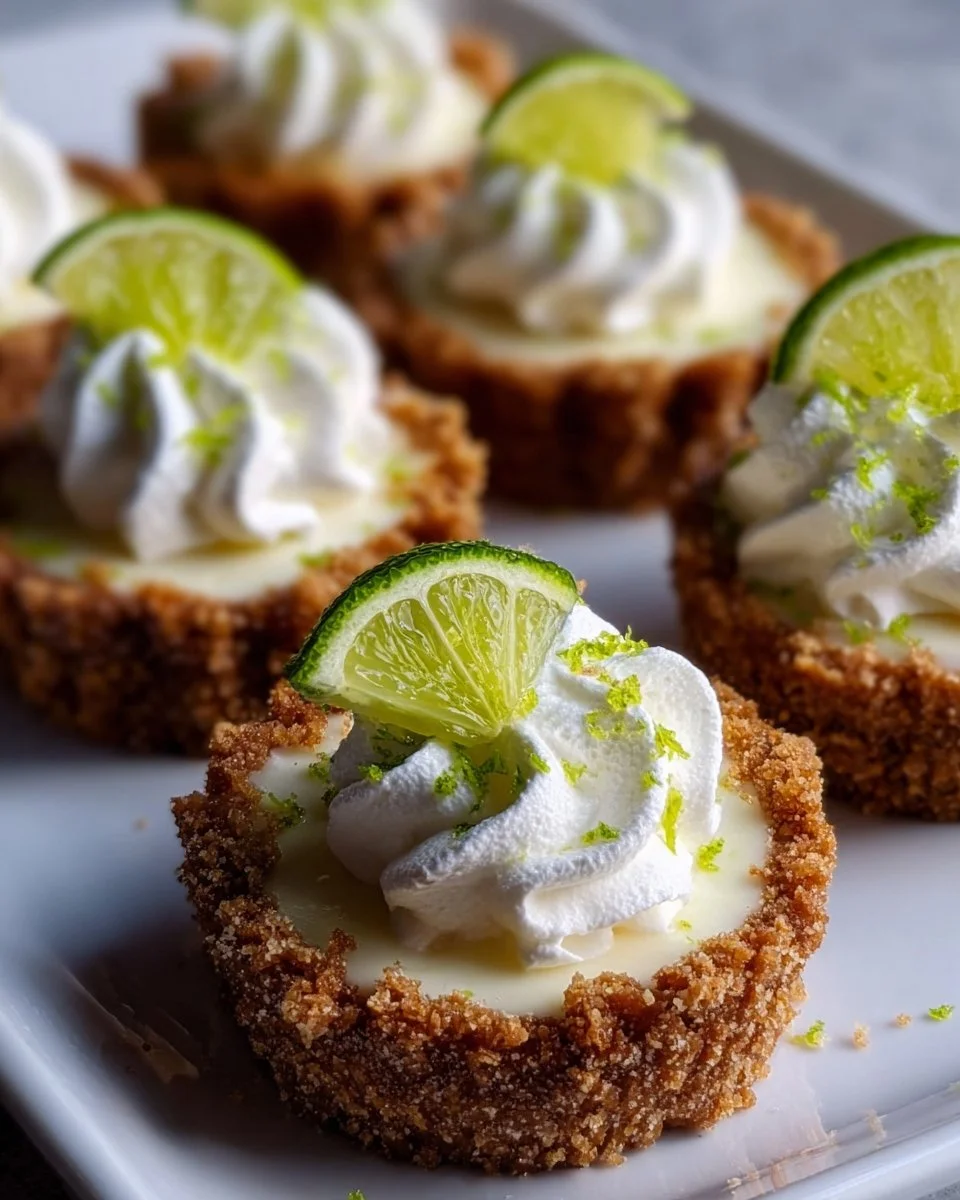
The sun shines brightly, casting a golden hue over warm summer days as the aroma of zest lingers in the air. Imagine sinking your teeth into a small, chilled burst of creamy bliss, the tang of fresh limes dancing on your palate as you relish in the refreshing sweetness of a well-balanced dessert. No-Bake Mini Key Lime Pies capture the essence of summer while offering a delightful escape from the heat. These tiny delights invite you to dip into their crisp crusts, revealing smooth, luscious filling that whisks you away to a tropical paradise with each delectable bite.
The combination of flaky graham cracker crust and silky, citrus-infused filling creates a pirouette of textures that leaves your taste buds longing for more. As you savor these individual pies, you can’t help but smile, recalling sun-kissed beaches and breezy afternoons. Whether enjoyed at a backyard barbecue, a festive gathering, or a simple afternoon treat, these mini key lime pies evoke joy and whimsy at every turn.
Why You’ll Love This No-Bake Mini Key Lime Pies Recipe
What sets these No-Bake Mini Key Lime Pies apart is their sheer simplicity and eye-catching charm. With just a handful of ingredients, you can create a stunning dessert that doubles as a conversation starter. The tangy flavor of fresh key limes brings a vibrant zing, contrasting beautifully with the creamy sweetened condensed milk. The graham cracker crust provides the perfect crunch, making every bite a harmonious blend of creaminess and texture.
These mini wonders shine in various settings. They grace holiday tables, enhance summer picnics, and lend a playful touch to birthday celebrations. Their individual size encourages sharing while allowing each guest to indulge as they please. Plus, you can whip them together in no time, requiring little effort for maximum effect. Every pie presents a burst of sunshine on your plate, inviting you to take one more little slice—or two.
Preparation Phase & Tools to Use
Getting ready to make these delightful pies is an exciting process that can spark creativity in even the most novice of bakers. Start with essential tools that will make your culinary journey a breeze:
- Mixing bowls: Splendid for combining ingredients, choose at least two varying sizes to accommodate pie crust and filling.
- Measuring cups and spoons: Precision matters! Accurate measurements ensure flavor balance.
- Whisk: A trusty whisk helps blend your filling into a velvety consistency, effortlessly combining sweetened condensed milk with lime juice.
- Mini tart pans or muffin tin: These molds create the perfect vessel for your pies, ensuring even shapes that delight the eye.
- Rubber spatula: Ideal for scraping down the sides of bowls, a spatula helps you extract every last bit of that creamy filling.
As you prepare these mini key lime pies, ensure you have all your ingredients at room temperature, and be ready for a journey of flavors. Prepping the crust and filling in the correct order facilitates a smooth assembly process.
Ingredients for No-Bake Mini Key Lime Pies
- Graham cracker crumbs: The foundation of your pie crust, they provide a sweet crunch. If you’re feeling adventurous, consider substituting with crushed digestive biscuits or even chocolate cookies for a unique twist.
- Unsalted butter: This adds richness and acts as the glue for the crumbs. Melted butter is essential for ensuring the crust holds its shape.
- Sweetened condensed milk: Sweetness plays a vital role in contrast to the tangy lime. Substitute with coconut cream for a dairy-free option, although the texture may vary slightly.
- Fresh key lime juice: Use the real thing for an authentic flavor experience. Regular lime juice works too but may slightly vary the flavor.
- Lime zest: This offers vibrant notes and beautiful visual appeal. Fresh zest enhances the essence, while dried lime powder can serve as a substitute in extreme cases.
How to Make No-Bake Mini Key Lime Pies
-
Prepare the crust: In a mixing bowl, combine graham cracker crumbs and melted unsalted butter. Stir until every crumb glistens. Press this mixture firmly into the bottom and slightly up the sides of mini tart pans to form the perfect crust.
-
Make the filling: In another bowl, whisk together the sweetened condensed milk and fresh key lime juice until smooth and well combined. This mixture should have a thick, creamy texture that promises to excite your taste buds.
-
Fill the crusts: Pour the luscious filling into the prepared crusts, spreading evenly to avoid any gaps. The filling should sit neatly atop the crust, showcasing its creamy texture.
-
Chill: Place these mini pies in the refrigerator. Allow them to chill for at least a few hours—this crucial step helps the filling set beautifully and enhances the flavor profile.
-
Garnish before serving: Just before it’s time for dessert, add a sprinkle of lime zest atop the pies for a vibrant pop of color and a refreshing kick.
Chef’s Notes & Helpful Tips
- Make-ahead tips: Prepare these delightful pies a day in advance. They keep well in the refrigerator and taste even more fabulous after the flavors meld overnight!
- Cooking alternatives: If you prefer a warm twist, consider briefly baking the crust in an oven at 350°F for a crispier base. However, the quintessential no-bake method retains that fresh summery essence.
- Customization ideas: Get creative! Add a dollop of whipped cream on top, throw in a few crushed berries for an extra layer of flavor, or even swirl in some coconut cream for a tropical flair.
Common Mistakes to Avoid
Creating the perfect No-Bake Mini Key Lime Pies doesn’t have to be daunting. Avoid these common pitfalls:
- Overmixing the filling: Whisk gently to combine. Overmixing can introduce air and create an undesirable texture.
- Skipping the chill time: Patience is essential! Skipping the refrigeration step can result in a filling that does not hold together when served.
- Using bottled lime juice: For an authentic taste, always opt for fresh limes. Bottled juice pales in comparison.
- Incorrect proportions: Make sure to measure accurately. Too much or too little of any ingredient may sway the flavor or texture.
What to Serve With No-Bake Mini Key Lime Pies
Pair these delightful mini key lime pies with complementary flavors to create a stunning dessert spread:
- Fresh whipped cream: A dollop enhances the creaminess and provides a sweet contrast.
- Berries: Strawberries, blueberries, or raspberries add a fruity balance and vibrant color.
- Mint leaves: A sprig of fresh mint brings a fresh twist and appealing aroma.
- Toasted coconut: This adds a delightful crunch and subtle sweetness, amplifying the tropical vibes.
- Coconut sorbet: Serve a small scoop alongside for a dreamy tropical experience.
- Iced tea or lemonade: These beverages perfectly refresh and complement the zesty tang.
Storage & Reheating Instructions
These mini pies are best enjoyed fresh but can be stored in the refrigerator for up to five days in an airtight container. For longer storage, they can be frozen for up to a month. When you’re ready to enjoy, pull them from the freezer and let them thaw in the refrigerator for a few hours before serving. Avoid reheating, as the texture may be affected.
Estimated Nutrition Information
While enjoying the velvety goodness of these mini key lime pies, a rough estimate of their nutrition content per individual pie is as follows:
- Calories: 190
- Protein: 2g
- Carbohydrates: 28g
- Fat: 8g
- Sugars: 10g
(Please note that values may vary based on specific brands and measurements used.)
FAQs
1. Can I use regular limes instead of key limes for this recipe?
Yes! Regular limes work perfectly fine. Although the flavor may be slightly different and less intense than key limes, your mini pies will still taste wonderful.
2. How do I keep my crust from being soggy?
Make sure to press the graham cracker crumbs tightly into the tart pans. This helps create a sturdy base. Chilling the crust before adding the filling also helps firm it up.
3. Can I make these mini pies gluten-free?
Absolutely! Substitute the regular graham crackers with gluten-free ones. The flavor and texture remain delightful despite the adjustment.
4. What can I do if my filling doesn’t set properly?
Ensure that the mixture chilled long enough. If you encounter a runny filling, consider adding more key lime juice and letting it chill longer to allow it to thicken.
5. How can I transport these mini pies without ruining them?
Use a sturdy container that securely holds the individual pies. Chilling them well before transport helps prevent them from shifting. Keeping them cool will also maintain their texture.
Conclusion
Every bite of these luscious No-Bake Mini Key Lime Pies invites you to a sun-soaked adventure, embodying the flavor and spirit of summer in every crumb and drop. Their appeal stretches far beyond the taste; they carry memories of laughter-filled gatherings and shared moments of joy. As you embark on this delightful culinary journey, let the bright, zesty flavor fill your heart with warmth and happiness. So, gather your ingredients and get ready to create a delightful treat that promises to steal the show and leave every guest yearning for one last bite. Enjoy every moment of preparation, for this recipe transforms simple elements into an unforgettable experience.
Print
No-Bake Mini Key Lime Pies
- Prep Time: 15 minutes
- Cook Time: 0 minutes
- Total Time: 255 minutes
- Yield: 12 servings 1x
- Category: Dessert
- Method: No-Bake
- Cuisine: American
- Diet: Vegetarian
Description
Delightful individual key lime pies with a creamy filling and crisp graham cracker crust, perfect for summer gatherings.
Ingredients
- 1 ½ cups graham cracker crumbs
- ½ cup unsalted butter, melted
- 1 cup sweetened condensed milk
- ½ cup fresh key lime juice
- 1 tablespoon lime zest
Instructions
- Prepare the crust: In a mixing bowl, combine graham cracker crumbs and melted unsalted butter. Stir until every crumb glistens. Press this mixture firmly into the bottom and slightly up the sides of mini tart pans.
- Make the filling: In another bowl, whisk together the sweetened condensed milk and fresh key lime juice until smooth and well combined.
- Fill the crusts: Pour the luscious filling into the prepared crusts, spreading evenly to avoid any gaps.
- Chill: Place these mini pies in the refrigerator and allow them to chill for at least 240 minutes.
- Garnish before serving: Just before serving, add a sprinkle of lime zest atop the pies.
Notes
For a unique twist, consider substituting graham crackers with crushed chocolate cookies or digestive biscuits. The flavors blend beautifully.
Nutrition
- Serving Size: 1 pie
- Calories: 190
- Sugar: 10g
- Sodium: 150mg
- Fat: 8g
- Saturated Fat: 5g
- Unsaturated Fat: 3g
- Trans Fat: 0g
- Carbohydrates: 28g
- Fiber: 1g
- Protein: 2g
- Cholesterol: 15mg