The aroma of warm, freshly baked bread wafts through the air, teasing your senses and igniting a spark of excitement. You know you’re in for a treat as you approach the oven, where golden orbs of goodness await. As you open the door, a rush of warmth greets you, and the sight of those garlic butter cheese bombs makes your mouth water. Each bite promises a delightful explosion of flavors — a perfect blend of creamy melted cheese, rich butter, and the subtle kick of garlic, all wrapped in a tender dough. This isn’t just food; this is comfort, joy, and the essence of home baked into one delicious package.
These delightful bites hold more than just cheese; they encapsulate a moment to savor. With a delicate crunch on the outside, each cheese bomb yields to a soft, pillowy center. The moment you sink your teeth in, the warm cheese oozes out, inviting you to indulge further. The minced garlic dances harmoniously with the buttery goodness, leaving a lingering taste that is both rich and savory. Perfect for gatherings, cozy family dinners, or simply treating yourself after a long day, garlic butter cheese bombs emerge as not just a side but as the star of the show.
Why You’ll Love This Garlic Butter Cheese Bombs
Garlic butter cheese bombs stand out for a multitude of reasons. First, they possess an irresistible combination of textures and flavors that appeal to everyone. The soft, doughy exterior envelops a luxurious cheesy filling, creating a bite that’s both satisfying and indulgent. You’ll find this dish a versatile addition to any meal – whether served as a crowd-pleasing appetizer at a party, a cozy side with your favorite pasta, or a warm snack during movie nights.
Each ingredient plays a crucial role in this recipe, resulting in a flavor profile that enchants the palate. The slight sweetness of the dough complements the savory richness of the garlic and butter, while the mozzarella cheese provides that delightful stretchy texture that you crave. Beyond taste, these cheese bombs are simple to make, using common kitchen staples, making them a go-to recipe anytime you need a comfort food fix. In short, once you taste these heavenly bites, you’ll wonder how you ever lived without them!
Preparation Phase & Tools to Use
Before diving into the delicious process of creating garlic butter cheese bombs, let’s talk about the essential tools you’ll need:
-
Mixing Bowls: Having a couple of mixing bowls allows you to separate different stages of your preparation process – one for your dough, and another for your buttery garlic mixture.
-
Whisk or Fork: Use this to mix your yeast with water and sugar, ensuring it activates properly.
-
Rolling Pin: While not strictly necessary, a rolling pin helps in flattening the dough uniformly, making it easier to create perfectly shaped cheese bombs.
-
Baking Sheet: A greased baking sheet is essential for creating that lovely golden crust, allowing the cheese bombs to expand and bake evenly.
-
Kitchen Towel: Cover your dough while it rises; this keeps moisture in, ensuring a soft and fluffy finished product.
Preparation Tip: Before starting, gather all your ingredients and tools. This way, you’ll have everything at hand, making the baking process smoother and more enjoyable.
Ingredients for Garlic Butter Cheese Bombs
Gather these ingredients to whip up your fragrant garlic butter cheese bombs:
- 1 cup warm water: Activates the yeast for a bubbly, airy dough.
- 2 teaspoons active dry yeast: Leavening agent, creating that delightful rise.
- 2 tablespoons sugar: A touch of sweetness that balances the savory elements.
- 3 cups all-purpose flour: The foundation for your dough, creating structure.
- 1 teaspoon salt: Enhances the overall flavor of the dough.
- 2 tablespoons olive oil: Keeps the dough moist while adding a hint of richness.
- 1 cup shredded mozzarella cheese: The star of the filling, offering creaminess and stretch.
- ½ cup butter, melted: Adds richness and flavor, essential for the garlic butter glaze.
- 4 cloves garlic, minced: Provides that unmistakable aroma and savory punch.
- 2 tablespoons fresh parsley, chopped: Brightens the dish with fresh herbal notes.
Feel free to make substitutions based on dietary restrictions or personal taste. For instance, gluten-free flour can be used to make a gluten-free version, and cheddar or gouda can replace mozzarella for a different cheese experience!
How to Make Garlic Butter Cheese Bombs
Creating these garlic butter cheese bombs is as satisfying as enjoying them. Follow these simple steps for a flawless outcome:
-
Activate the Yeast: In a small bowl, combine warm water, yeast, and sugar. Allow this mixture to sit for about 5 minutes until you see bubbles forming on the surface. This signifies that your yeast is active and ready to work its magic.
-
Prepare the Dough: In a large mixing bowl, combine flour and salt. Form a well in the center and pour in the yeast mixture and olive oil. Mix until combined, then knead the dough on a lightly floured surface for about 5-7 minutes until it feels smooth and elastic.
-
Let It Rise: Cover the bowl with a clean kitchen towel. Place it in a warm, sheltered spot and allow the dough to rise for approximately 1 hour, or until it doubles in size. Patience is key here!
-
Preheat the Oven: Set your oven to preheat at 375°F (190°C), filling your kitchen with anticipation as it warms.
-
Shape the Cheese Bombs: Punch down the risen dough to release any air. Divide it into small pieces. Flatten each piece into a circle, placing a spoonful of mozzarella cheese at the center. Fold and seal the dough around the cheese, rolling it into a ball.
-
Arrange on Baking Sheet: Place your dough balls on a greased baking sheet, making sure there’s enough space between them to expand beautifully.
-
Brush with Garlic Butter: In a small bowl, mix the melted butter with minced garlic and chopped parsley. Generously brush the mixture over each dough ball to ensure they’re drenched in deliciousness.
-
Bake: Slide the baking sheet into the oven and bake for 15-20 minutes until they turn a gorgeous golden brown. Let the aroma guide you — you’ll know they’re ready when you catch a whiff of buttery garlic goodness.
Chef’s Notes & Helpful Tips
-
Make-Ahead Tips: You can prepare the dough in advance. Allow it to rise, punch it down, and then cover it tightly and store it in the refrigerator overnight. It will continue to develop flavor, and you can shape and bake it the next day!
-
Cooking Alternatives: If you want a quicker method, consider using an air fryer. Preheat the air fryer to 350°F (175°C) and bake for about 10-12 minutes for a crisp exterior and gooey center.
-
Customization Ideas: Switch up the main filling! Experiment with different cheeses like gouda or pepper jack for a spicy kick. You can also add herbs or spices into the dough or filling for an added twist, such as Italian seasoning or red pepper flakes.
Common Mistakes to Avoid
-
Using Cold Water: Ensure the water is warm but not hot. Too hot can kill the yeast, and too cold will prevent it from activating, leading to flat cheese bombs.
-
Not Kneading Enough: Knead your dough until it’s smooth and elastic. Not doing so will result in dense, tough bread rather than light, fluffy bites.
-
Skipping the Rising Step: Allowing your dough to rise is crucial for creating the perfect texture. Don’t rush this step; it develops flavor and lightness.
-
Overfilling with Cheese: It’s tempting to add more cheese, but overfilling can lead to bursts in the dough during baking. Stick to a spoonful for the best results.
What to Serve With Garlic Butter Cheese Bombs
These garlic butter cheese bombs shine as a standalone snack, but they also pair beautifully with a variety of culinary companions:
-
Marinara Sauce: The classic pairing! This tangy sauce complements the rich flavors of the cheese bombs perfectly.
-
Salads: A fresh green salad adds a crunchy texture and balance to the indulgence of the cheese bombs, making your meal more complete.
-
Soups: Pair with a buttery garlic clam chowder for a cozy, hearty meal.
-
Grilled Veggies: The sweetness of grilled seasonal vegetables enhances the overall flavor experience.
-
Pasta Dishes: Use as a side with garlic butter linguini or a creamy fettuccine Alfredo for an Italian feast.
-
Cheese Platter: Serve alongside assorted cheeses, nuts, and fruits during your next gathering for a delightful charcuterie experience.
-
Dips: Experiment with different dips like ranch or spicy aioli for an interactive experience.
Storage & Reheating Instructions
Store any leftovers in an airtight container in the refrigerator for up to three days. To reheat, preheat your oven to 350°F (175°C) and bake for about 5–10 minutes until they’re warmed through and the cheese is melty again. For longer storage, freeze them before baking. Once frozen, simply pop them in the oven straight from the freezer; bake for a few extra minutes to ensure they cook through.
Estimated Nutrition Information
Approximate values per serving (2 cheese bombs):
- Calories: 250
- Protein: 8g
- Carbohydrates: 30g
- Fat: 12g
- Fiber: 1g
(Note: Nutritional content will vary based on exact ingredients used, so it’s always wise to check if you’re tracking specific dietary needs.)
FAQs
1. Can I use different types of cheese?
Absolutely! Feel free to mix up your cheese choices. Cheddar, gouda, or even cream cheese give a delicious twist.
2. What if my dough doesn’t rise?
Ensure your yeast is fresh and that you used warm water. If it still doesn’t rise, try placing it in a warmer area or extending the rising time.
3. Can I make these garlic butter cheese bombs vegan?
Yes! Substitute non-dairy cheese, use a vegan butter substitute, and replace the olive oil with a vegan-friendly option.
4. How can I tell when they’re done baking?
Look for a golden brown color and a delightful aroma wafting through your kitchen. The internal cheese should be gooey and irresistible!
5. Can I prepare the dough in advance?
Definitely! You can prepare the dough, let it rise, and then store it in the refrigerator overnight. Just remember to shape and bake it the next day.
Conclusion
Garlic butter cheese bombs are not just a recipe; they are an experience waiting to unfold in your kitchen and your dining table. Their captivating aroma, delightful texture, and mouthwatering flavor will undoubtedly make them a favorite among family and friends alike. With just a few simple ingredients and some joyful preparation, you can create a dish that brings warmth and happiness to every gathering. So roll up your sleeves, embrace your inner chef, and bring these cheesy delights to life. Embrace the warmth and comfort, and let your taste buds rejoice in each heavenly bite!
Print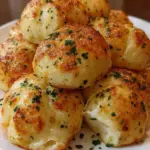
Garlic Butter Cheese Bombs
- Prep Time: 15 minutes
- Cook Time: 20 minutes
- Total Time: 35 minutes
- Yield: 12 servings 1x
- Category: Snack
- Method: Baking
- Cuisine: Italian
- Diet: Vegetarian
Description
Indulge in these warm garlic butter cheese bombs, featuring creamy melted mozzarella wrapped in a soft, pillowy dough, perfectly seasoned with garlic and herbs.
Ingredients
- 1 cup warm water
- 2 teaspoons active dry yeast
- 2 tablespoons sugar
- 3 cups all-purpose flour
- 1 teaspoon salt
- 2 tablespoons olive oil
- 1 cup shredded mozzarella cheese
- ½ cup butter, melted
- 4 cloves garlic, minced
- 2 tablespoons fresh parsley, chopped
Instructions
- Activate the yeast: In a small bowl, combine warm water, yeast, and sugar. Allow this mixture to sit for about 5 minutes until you see bubbles forming on the surface.
- Prepare the dough: In a large mixing bowl, combine flour and salt. Form a well in the center and pour in the yeast mixture and olive oil. Mix until combined, then knead the dough on a lightly floured surface for about 5-7 minutes.
- Let it rise: Cover the bowl with a clean kitchen towel and place it in a warm spot. Allow the dough to rise for approximately 1 hour, or until it doubles in size.
- Preheat the oven: Set your oven to preheat at 375°F (190°C).
- Shape the cheese bombs: Punch down the risen dough, divide it into pieces, flatten into circles, adding mozzarella cheese in the center before sealing.
- Arrange on a baking sheet: Place dough balls on a greased baking sheet, ensuring enough space for expansion.
- Brush with garlic butter: Mix melted butter with minced garlic and parsley, generously brushing over each dough ball.
- Bake: Slide into the oven and bake for 15-20 minutes until golden brown.
Notes
For a quicker method, consider using an air fryer. Adjust cooking time accordingly.
Nutrition
- Serving Size: 2 cheese bombs
- Calories: 250
- Sugar: 2g
- Sodium: 300mg
- Fat: 12g
- Saturated Fat: 6g
- Unsaturated Fat: 4g
- Trans Fat: 0g
- Carbohydrates: 30g
- Fiber: 1g
- Protein: 8g
- Cholesterol: 25mg