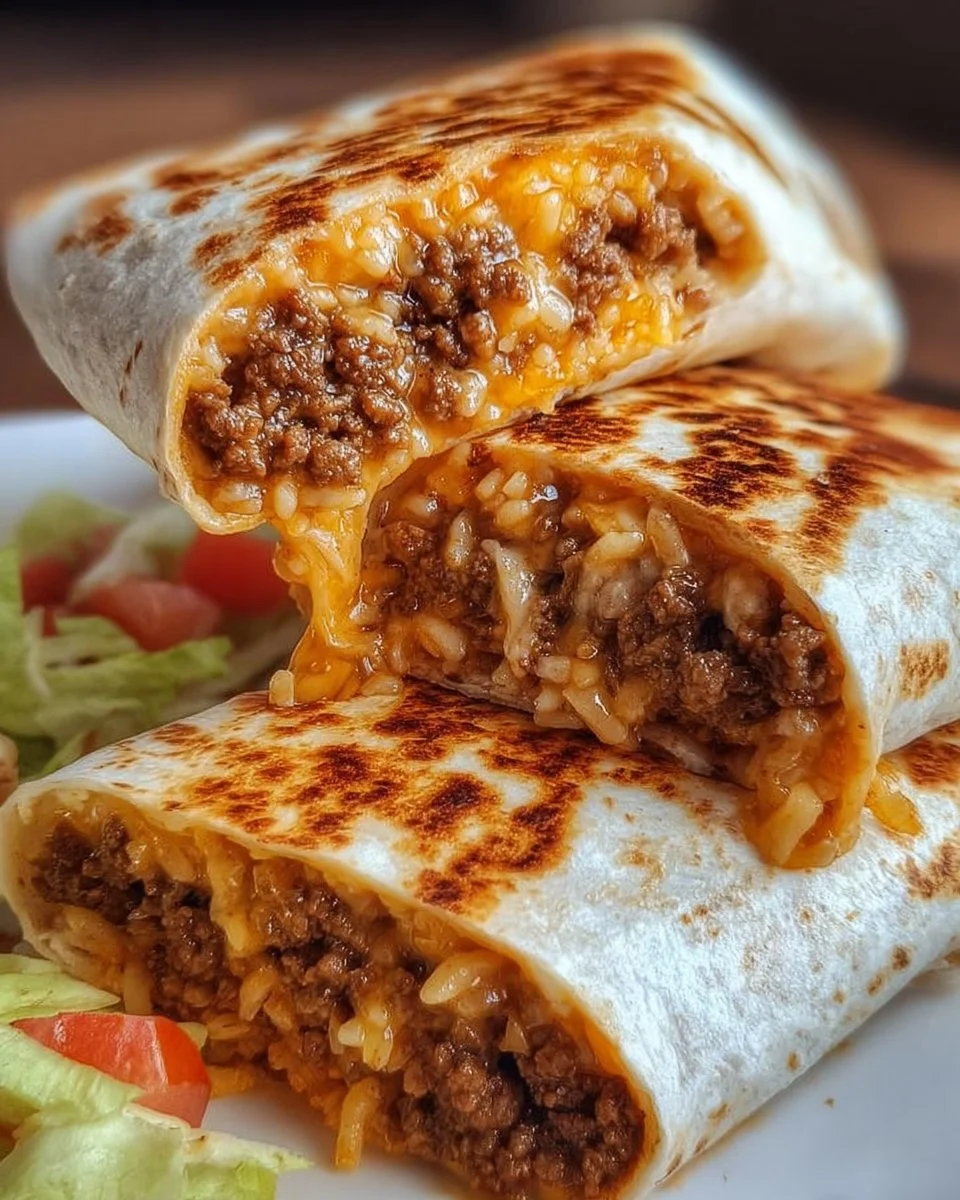
The first bite of a Grilled Cheese Burrito is nothing short of a delicious revelation. Picture this: a warm, golden-brown exterior that greets you with a satisfying crunch, revealing a melty world of flavors and textures tucked within. As you sink your teeth into one of these culinary wonders, the creamy cheese envelops juicy, seasoned ground beef and the crisp freshness of lettuce, creating a delightful contrast that dances on your palate. Each mouthful balances the savory warmth of hearty fillings with the vibrant pop of succulent tomatoes and the rich decadence of nacho cheese sauce, culminating in a feast that is both comforting and exhilarating.
It’s the kind of dish that wraps you in a warm hug, grounding the chaos of the day in sheer joy. Whether you’re sharing it with friends during a casual get-together, savoring it for lunch on a hectic weekday, or indulging in it as a late-night snack, this Grilled Cheese Burrito promises to elevate any occasion. The aroma of butter hitting a hot skillet signals something truly special—your senses awaken as the savory scent fills the air, and suddenly, your mouth waters, anticipating the cheesy goodness that awaits.
Why You’ll Love This Grilled Cheese Burrito
This Grilled Cheese Burrito effortlessly combines familiar comfort with exciting flavors, making it a dish that resonates with everyone. It boasts the perfect balance of creamy cheese, tender meat (or hearty beans for a vegetarian option), and the freshness of crisp vegetables, all encased in a warm tortilla. It invites endless customization: switch out meats, adjust spice levels, or load it up with more toppings to suit your taste.
Perfect for kids and adults alike, this recipe shines at various gatherings—lazy weekend brunches, vibrant taco nights, or impromptu movie marathons. Each bite fills your belly and warms your soul in a way that few other foods can. The way the cheese stretches as you take another bite is satisfaction personified, making it hard to put down. It stands out not only for its taste but its ability to stir up nostalgia while delivering an exciting twist that leaves you craving more.
Preparation Phase & Tools to Use
To dive into crafting this culinary marvel, gather your essential tools. A heavy skillet is a must; it ensures even heat distribution, allowing your burrito to grill beautifully without any cold spots. A good spatula helps you flip the burrito without tearing it, preserving that essential golden crust. Additionally, a cutting board and sharp knife streamline the preparation process, making slicing and dicing your ingredients a breeze.
Practical preparation tips can significantly enhance your cooking experience. Always start with shredded cheese that has a good melting quality; pre-shredded cheeses usually contain anti-caking agents that can affect melting. When grilling, keep a close eye on the heat. It can be easy to get distracted, but moderate heat is crucial to avoid burning while ensuring that the inside melts perfectly.
Ingredients for Grilled Cheese Burrito
-
2 large flour tortillas: The foundation of your burrito. Choose soft, pliable tortillas for easy wrapping. Whole wheat is a great substitute if you’re looking for a healthier option.
-
1 cup shredded cheese (cheddar and Monterey Jack): These cheeses melt beautifully, creating that stretchy gooeyness we all love. Feel free to mix it up with pepper jack for a spicy kick or mozzarella for a milder taste.
-
1 cup cooked and seasoned ground beef or beans: Beef brings a hearty, satisfying flavor. Swap in black beans or refried beans for a vegetarian option that still packs protein.
-
1/2 cup shredded lettuce: Adds crispness and freshness to each bite, balancing the richness of the cheese.
-
1/4 cup diced tomatoes: Juicy and sweet, tomatoes contribute a refreshing burst to the filling.
-
2 tablespoons nacho cheese sauce: A small drizzle elevates the burrito’s flavor, making it decadent. For a homemade alternative, consider blending cream cheese and spices with shredded cheese.
-
Butter for grilling: A sauté like no other. Butter creates a luscious, golden crust that’s utterly irresistible.
How to Make Grilled Cheese Burrito
-
Preheat your skillet over medium heat to ensure even cooking as you grill the burrito.
-
On one tortilla, evenly layer the shredded cheese, followed by the cooked and seasoned ground beef (or beans), shredded lettuce, diced tomatoes, and a drizzle of nacho cheese sauce.
-
Carefully place the second tortilla on top, encasing the delicious fillings for maximum indulgence.
-
Spread butter generously on the outside of the burrito, ensuring full coverage for that perfect crispy exterior.
-
Gently place the burrito in the skillet and grill for 3-4 minutes on each side. Listen for that delightful sizzle, and take a peek to make sure it’s turning a beautiful golden brown. The cheese should be fully melted inside.
-
Remove your burrito from the skillet and allow it to rest for a minute. This waiting period builds anticipation, and it also helps prevent burns when slicing!
-
With a sharp knife, slice the burrito in half. Watch as the molten cheese pulls and stretches; don’t forget to take in that heavenly aroma!
Chef’s Notes & Helpful Tips
When you’re craving the Grilled Cheese Burrito but short on time, these make-ahead tips can come in handy. Prepare the fillings in advance and assemble the burrito just before grilling for a quick meal. Alternatively, consider using an air fryer if you prefer a less greasy option; just adjust cooking times to ensure it achieves a crispy exterior.
Customization opens the door to endless possibilities. Load your burrito with guacamole, add jalapeños for heat, or sprinkle in some cilantro for freshness. Not a fan of beef? Replace it with cooked chicken or your favorite taco filling for a different take.
Common Mistakes to Avoid
To make sure you nail this recipe, steer clear of these common pitfalls. Cooking the burrito on high heat may lead to a burnt exterior while leaving the inside cold. Be patient and maintain medium heat for the best results. Also, don’t overload your burrito; it may be tempting to add all your favorite toppings, but too much filling can make it hard to grill properly and might lead to a messy experience.
What to Serve With Grilled Cheese Burrito
Pair your Grilled Cheese Burrito with an array of sides to create a complete meal. Here are a few suggestions:
- Guacamole: Its creaminess and vibrant flavor complement the burrito beautifully.
- Sour Cream: A dollop adds coolness and tang, perfect for balancing rich flavors.
- Pico de Gallo: The freshness of diced tomatoes, onions, and cilantro cuts through the heartiness of the burrito.
- Mexican Rice: Serve a side of fluffy, seasoned rice for a filling, comforting touch.
- Chips and Salsa: Crunchy tortilla chips with your favorite salsa bring that fun, crunchy contrast.
- Elote (Mexican Street Corn): Grilled corn slathered in creamy sauce and cheese elevates your meal experience.
- Refried Beans: A classic side that pairs perfectly with your burrito for added texture and flavor.
Storage & Reheating Instructions
Store any leftovers in an airtight container in the refrigerator, where they will keep fresh for up to three days. For longer storage, consider freezing your burritos—just wrap them tightly in foil or plastic wrap. When you’re ready to enjoy them, reheat directly from the freezer in the oven or an air fryer for a crispy finish. Cook until warmed through, typically around 15-20 minutes at 375°F if frozen.
Estimated Nutrition Information
Approximate values per serving:
- Calories: 500
- Protein: 25g
- Carbohydrates: 38g
- Fat: 30g
- Fiber: 4g
These values may vary based on the specific brands and quantities of ingredients used. Always adjust based on your own ingredients.
FAQs
Can I make this burrito vegetarian?
Absolutely! Substitute the meat with seasoned black beans or any legumes of your choice. You can also load it with additional vegetables like bell peppers or zucchini.
Can I reheat this in the microwave?
Yes, you can! However, be aware that the tortilla might not stay as crispy as it would when reheated in a skillet or air fryer. Heat it in short intervals and enjoy it right away.
What cheese works best for this recipe?
A combination of cheddar and Monterey Jack is ideal because they melt beautifully together. You can also experiment with pepper jack for some extra spice or creamy mozzarella for a milder taste.
Can I add more ingredients?
Definitely! Sliced jalapeños, corn, or even a drizzle of hot sauce can bring new dimensions to your Grilled Cheese Burrito.
How do I know when my burrito is fully cooked?
Look for a golden-brown exterior and listen for that lovely sizzle while it grills. A melted filling is the goal, so you can cut into it; if the cheese flows like melted lava, you’ve succeeded!
As you savor every bite of this Grilled Cheese Burrito, know that you’re indulging in a dish crafted from your own kitchen, filled with flavors that satisfy both your hunger and your soul. Encourage your friends and family to join in on the experience, share stories, laughter, and warmth—all wrapped up together as deliciously as the ingredients in your burrito. The journey of flavors and textures awaits; it’s time to gather your ingredients and let the magic unfold!
Print
Grilled Cheese Burrito
- Prep Time: 10 minutes
- Cook Time: 8 minutes
- Total Time: 18 minutes
- Yield: 2 servings 1x
- Category: Main Course
- Method: Grilling
- Cuisine: Mexican
- Diet: Vegetarian option available
Description
A delicious fusion of creamy cheese, seasoned meat or beans, and fresh vegetables, all wrapped in a crispy tortilla.
Ingredients
- 2 large flour tortillas
- 1 cup shredded cheese (cheddar and Monterey Jack)
- 1 cup cooked and seasoned ground beef or beans
- 1/2 cup shredded lettuce
- 1/4 cup diced tomatoes
- 2 tablespoons nacho cheese sauce
- Butter for grilling
Instructions
- Preheat your skillet over medium heat to ensure even cooking as you grill the burrito.
- Layer the shredded cheese evenly on one tortilla, followed by the cooked and seasoned ground beef (or beans), shredded lettuce, diced tomatoes, and a drizzle of nacho cheese sauce.
- Place the second tortilla on top, encasing the delicious fillings for maximum indulgence.
- Spread butter generously on the outside of the burrito, ensuring full coverage for that perfect crispy exterior.
- Gently place the burrito in the skillet and grill for 3-4 minutes on each side until golden brown and the cheese is melted.
- Remove your burrito from the skillet and allow it to rest for a minute.
- Slice the burrito in half to reveal the melty filling and enjoy!
Notes
For a vegetarian option, replace ground beef with beans. Customize with additional toppings as desired.
Nutrition
- Serving Size: 1 burrito
- Calories: 500
- Sugar: 2g
- Sodium: 600mg
- Fat: 30g
- Saturated Fat: 15g
- Unsaturated Fat: 10g
- Trans Fat: 0g
- Carbohydrates: 38g
- Fiber: 4g
- Protein: 25g
- Cholesterol: 75mg