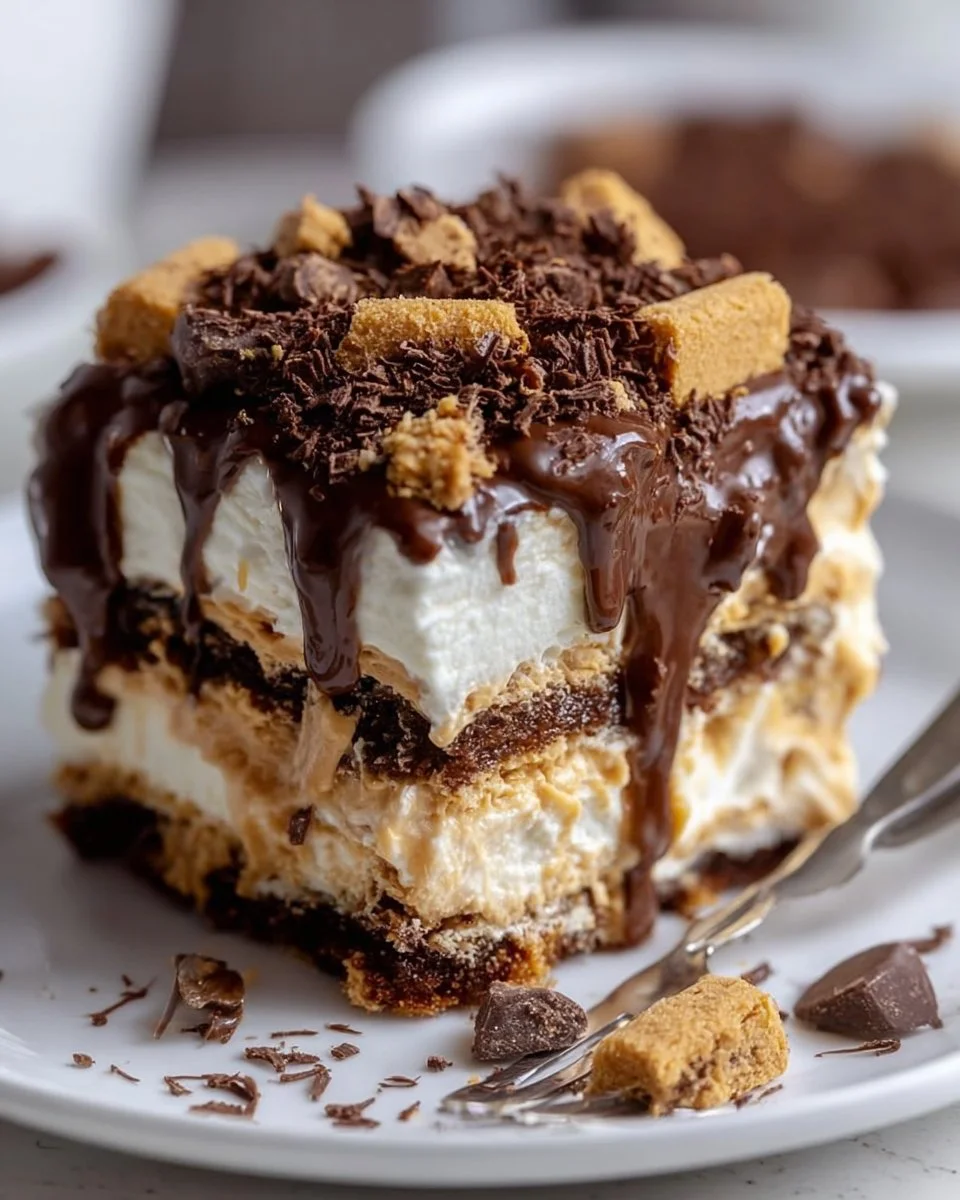
The sensation of sinking your spoon into a velvety slice of Peanut Butter Icebox Cake evokes a rush of nostalgia and pure bliss. Each moment surrounded by this delectable dessert feels like a warm embrace, drawing you in with each sweet bite. Imagine the creamy, rich peanut butter mingling effortlessly with airy whipped cream, creating a cloud-like filling that simply melts in your mouth. The graham crackers, crisp and slightly chewy from soaking in the sumptuous layers, add a delightful crunch that balances each spoonful. You breathe in the sweet, nutty aroma, and as you take a bite, the various textures and flavors dance on your palate, igniting a flare of happiness that only dessert can bring.
This Peanut Butter Icebox Cake does more than satisfy a sweet tooth—it crafts memories. Whether you share it with family after a hearty meal or serve it at summer gatherings, it steals the spotlight on any dessert table. The creamy filling and delightful crunch pair seamlessly together, transforming a simple gathering into a joyous celebration. This no-bake cake, with its layered elegance, makes it ideal for warm days when the last thing you want to do is turn on the oven. With charm in every layer, this delightful dessert beckons to be made time and time again.
Why You’ll Love This Peanut Butter Icebox Cake
This Peanut Butter Icebox Cake stands apart as a celebration of flavors and textures, ensuring it captivates everyone who takes a bite. The harmonious blend of creamy peanut butter takes center stage, delivering a scrumptious nutty flavor that dances playfully with the sweetness of powdered sugar. Meanwhile, the whipped cream adds an ethereal lightness, allowing the cake to effortlessly melt in your mouth and leaving a whisper of sweetness on your tongue. This delightful dessert not only tastes heavenly but also provides a canvas for creativity—decorate it how you wish or enjoy it as is, simple yet luxurious.
Perfect for birthdays, gatherings, or even as a delightful treat after a long day, this dessert shines in its simplicity. You can easily prepare it ahead of time, making it the ultimate stress-free option for hosting. With its stunning appearance and irresistible taste, this cake brings joy and indulgence in every slice, making it a worthy centerpiece for any occasion.
Preparation Phase & Tools to Use
Crafting the perfect Peanut Butter Icebox Cake requires only a few essential tools that can help you achieve flawless layers and a beautiful presentation.
- Mixing Bowls: A set of different size mixing bowls ensures that you can blend your ingredients smoothly without any mess.
- Electric Mixer: This tool helps create a luxuriously creamy filling in no time—your arm will thank you for skipping the manual whisking!
- Spatula: A spatula is perfect for gently folding ingredients to maintain that light, airy texture.
- 9×13-inch Baking Dish or Serving Plate: Use a clear dish to showcase the beautiful layers of cream, peanut butter, and graham crackers.
- Parchment Paper: Lining your dish makes it easier to remove the cake when it’s time to serve.
Preparation tips elevate your end result. Ensure your peanut butter is creamy and smooth for effortless blending, and allow your whipped cream to stabilize before folding it in. Patience during refrigeration is critical—giving the cake time to chill allows the flavors to meld beautifully.
Ingredients for Peanut Butter Icebox Cake
- 1 cup creamy peanut butter: The star of this dessert, creamy peanut butter lends a rich, nutty flavor. If desired, swap it for crunchy peanut butter for an added texture.
- 1 cup powdered sugar: This sweetener seamlessly blends into the peanut butter, ensuring a perfectly sweet filling without graininess.
- 2 cups whipped cream: The lightness of whipped cream tempers the peanut butter’s richness, creating a delicate balance. You can make your own or use store-bought.
- 1 package graham crackers: They provide that essential crunchy contrast. Consider using chocolate-flavored graham crackers for a fun twist!
- 1 teaspoon vanilla extract: This enhances the overall flavor profile, making every bite more delightful.
- Chocolate shavings or cocoa powder (optional): Adding these on top creates a beautiful presentation and a hint of chocolatey goodness.
How to Make Peanut Butter Icebox Cake
- In a mixing bowl, blend the creamy peanut butter, powdered sugar, and vanilla extract until smooth, ensuring no lumps remain.
- Gently fold the whipped cream into the peanut butter mixture, being careful to maintain the fluffy texture.
- Arrange a single layer of graham crackers at the bottom of your serving dish, making sure they fit snugly.
- Spread an even layer of the peanut butter mixture over the graham crackers, filling in any gaps.
- Continue layering by adding more graham crackers followed by the peanut butter filling until all components are used. Aim to end with a thick layer of the peanut butter mixture on top for a stunning finish.
- Cover the cake with plastic wrap or a lid and refrigerate it for at least four hours, though letting it sit overnight enhances flavor fusion.
- Before serving, garnish with chocolate shavings or a dusting of cocoa powder for an added touch of elegance.
Chef’s Notes & Helpful Tips
Making this luscious cake in advance encourages the mingling of flavors and makes hosting easier. Consider preparing it the night before or even a few days in advance. You can also customize the recipe by adding crushed cookies between layers, fresh banana slices, or drizzling chocolate or caramel into the layers for added decadence.
If you’re feeling adventurous and seek a slight variations in texture, consider using an air fryer to create a baked version, adjusting the graham crackers for a crispier base.
Common Mistakes to Avoid
- Ignoring the refrigeration time: Rushing this step means the cake won’t set properly. Always opt for the minimum of four hours, preferably letting it chill overnight.
- Overmixing the whipped filling: Doing so can deflate your mixture, leading to a denser filling. Gently fold until just combined for a light texture.
- Choosing stale graham crackers: Fresh crackers ensure the ideal crispiness and texture. Check the expiration date!
What to Serve With Peanut Butter Icebox Cake
Pair your Peanut Butter Icebox Cake with delightful companions.
- Fresh Berries: Their tartness contrasts beautifully with the sweetness of the cake.
- Coffee or Tea: A warm beverage enhances the flavors and balances the sweetness.
- Chocolate Sauce: A drizzle of rich sauce amplifies the dessert’s indulgence.
- Vanilla Ice Cream: A scoop adds a creamy, cold contrast that elevates the experience.
- Bananas: Slices of banana create a delightful pairing, complementing the peanut butter flavor.
- Crushed Nuts: Top the cake with chopped peanuts for extra crunch and visual appeal.
Storage & Reheating Instructions
Store any leftover Peanut Butter Icebox Cake in an airtight container in the refrigerator for up to a week. While this dessert is best served cold, there’s no need to reheat it—simply serve it chilled to maintain its creamy, smooth texture.
Estimated Nutrition Information
Approximate values per serving:
- Calories: 250
- Total Fat: 15g
- Saturated Fat: 6g
- Carbohydrates: 23g
- Sugars: 9g
- Protein: 6g
(Note: Values may vary based on specific ingredients used.)
FAQs
1. Can I use natural peanut butter for this recipe?
Yes, you can use natural peanut butter, but be aware that it may produce a slightly different texture because of the separation of oil. Stir it well before measuring and use it in the same proportions.
2. How can I make this dessert vegan?
Substitute creamy peanut butter with a vegan variety, use coconut whipped cream instead of regular whipped cream, and opt for vegan graham crackers to maintain the recipe’s integrity while catering to a vegan diet.
3. Can I freeze the Peanut Butter Icebox Cake?
Absolutely! It freezes well. Just make sure to wrap it tightly in plastic wrap to avoid freezer burn. Thaw it in the refrigerator overnight before serving.
4. How do I avoid a soggy graham cracker layer?
Use thicker layers of peanut butter filling and ensure the mixture is smooth but not overly wet. Arranging the layers tightly helps maintain the integrity of the crackers without making them soggy.
5. Can I serve it without refrigeration?
Serving it without refrigeration isn’t recommended, as it needs to set to achieve the right texture and flavor balance. Always chill it for the best experience.
Conclusion
Your journey to peanut butter euphoria awaits as you prepare this irresistible Peanut Butter Icebox Cake. Its creamy richness and delightful crunch promise to enchant your taste buds and create beautiful memories that you will cherish. Whether it’s for a celebration or a simple dessert to end your day, this cake is bound to be a crowd-pleaser. So go ahead, gather your ingredients, and indulge in the sweet satisfaction that comes with each delectable bite. Embrace the joy of creation, savor the flavors, and let the magic unfold in your kitchen. Happy baking!
Print
Peanut Butter Icebox Cake
- Prep Time: 15 minutes
- Cook Time: 0 minutes
- Total Time: 240 minutes
- Yield: 8 servings 1x
- Category: Dessert
- Method: No-Bake
- Cuisine: American
- Diet: Vegetarian
Description
A nostalgic, no-bake dessert featuring creamy peanut butter and airy whipped cream, layered with graham crackers for a delightful crunch.
Ingredients
- 1 cup creamy peanut butter
- 1 cup powdered sugar
- 2 cups whipped cream
- 1 package graham crackers
- 1 teaspoon vanilla extract
- Chocolate shavings or cocoa powder (optional)
Instructions
- Blend the creamy peanut butter, powdered sugar, and vanilla extract until smooth.
- Fold the whipped cream into the peanut butter mixture gently.
- Arrange a single layer of graham crackers at the bottom of your serving dish.
- Spread an even layer of the peanut butter mixture over the graham crackers.
- Continue layering graham crackers and peanut butter filling until all components are used.
- Cover the cake and refrigerate for at least 240 minutes.
- Garnish with chocolate shavings or cocoa powder before serving.
Notes
Prepare in advance for the best flavor integration. You can customize with additional ingredients like fresh fruit or chocolate drizzling.
Nutrition
- Serving Size: 1 serving
- Calories: 250
- Sugar: 9g
- Sodium: 150mg
- Fat: 15g
- Saturated Fat: 6g
- Unsaturated Fat: 7g
- Trans Fat: 0g
- Carbohydrates: 23g
- Fiber: 1g
- Protein: 6g
- Cholesterol: 30mg