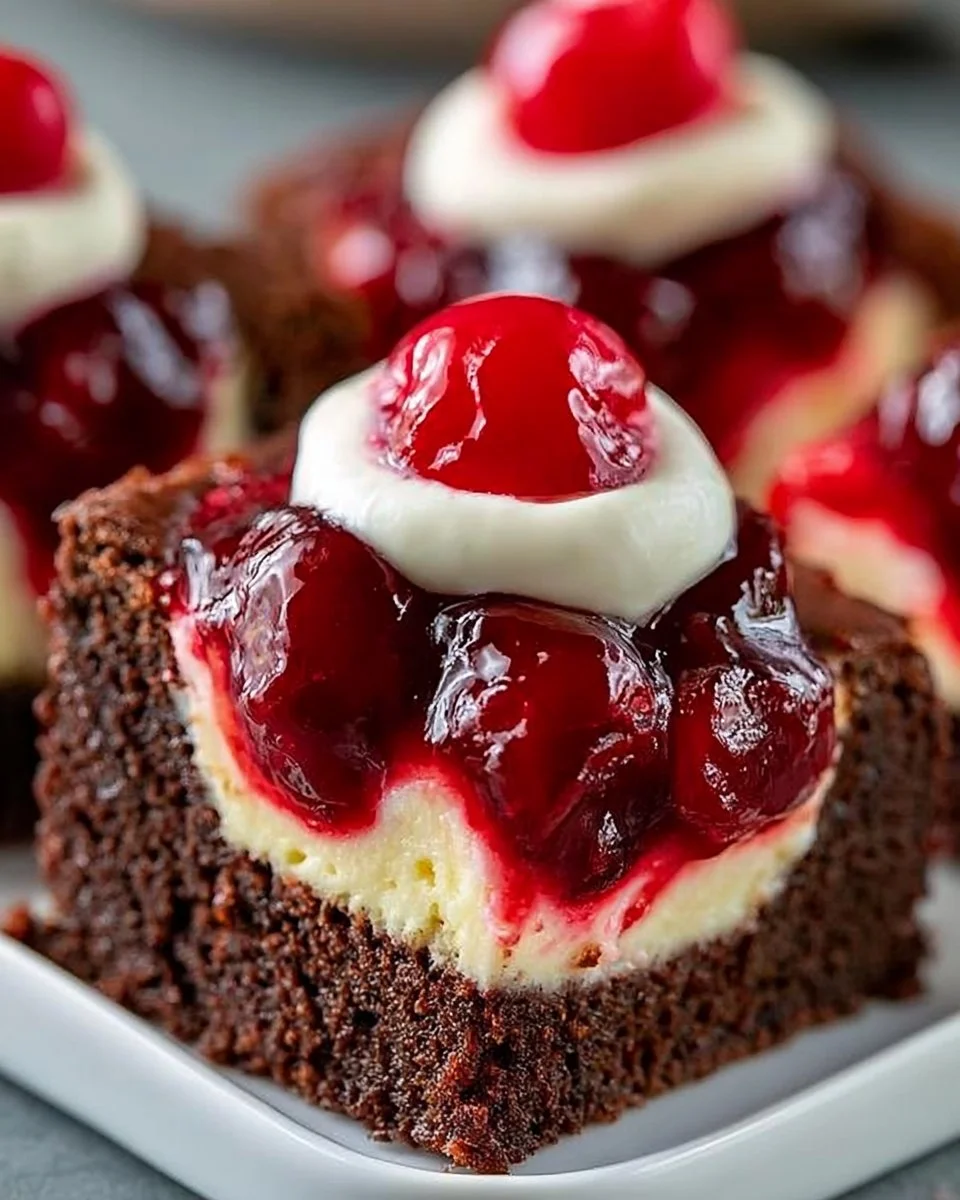
The moment you take a whiff of Cherry Cheesecake Brownie Bars baking in your oven, your kitchen transforms into a fragrant paradise. A warm, cocoa aroma envelops you, mingling with the sweet, slightly tart scent of cherries. These bars promise a delightful dessert experience, where each bite reveals a velvety richness swirled with creamy cheesecake and juicy cherry goodness. It’s a harmonious blend that pulls at your heartstrings and tantalizes your taste buds, creating a dessert that sings of warmth and nostalgia.
Imagine sinking your fork into these decadent layers. The bottom layer consists of a fudgy brownie base, dense yet tender, offering an indulgent bite that melts in your mouth. Just as the brownie gives way, you encounter the smooth cheesecake layer, a luscious blanket that envelops your palate with its rich, creamy texture. Finally, the cherry pie filling bursts forth with sweet and slightly tart flavors, a vibrant pop that balances out the sweetness of the brownies. Just thinking about it can make anyone swoon!
Elevate your dessert game with this enchanting treat. Perfect for gatherings, quiet evenings at home, or a little indulgence after a long day, these Cherry Cheesecake Brownie Bars capture the essence of joy that sweets often bring. Not only do they taste incredible, but they also boast a beautiful marbled appearance that impresses any guest. Baking these bars means sharing a slice of love, making memories in the kitchen, and delighting those lucky enough to savor the finished product.
Why You’ll Love This Cherry Cheesecake Brownie Bars
Several reasons make Cherry Cheesecake Brownie Bars irresistible. They harmonize three popular favorites: rich brownies, creamy cheesecake, and tart cherries. Each component plays a vital role in creating an astonishing depth of flavor and texture. Furthermore, they serve as the ideal dessert for various occasions, be it holiday gatherings, potlucks, or a cozy family dinner. Their looks alone might take center stage on your dessert table, drawing eager forks and hands toward them.
These bars also stand out thanks to their buildable nature. Feel free to experiment with flavors, add unique toppings, or even try different fruit fillings. Your options for customization are endless, ensuring you can create a version that resonates with your personal taste or delights your guests. Each bite offers a different but equally satisfying experience, keeping everyone coming back for another square.
Preparation Phase & Tools to Use
Creating the perfect Cherry Cheesecake Brownie Bars comes down to choosing the right tools and preparing efficiently. Here are the essentials you’ll need:
- 9×13 inch baking pan: This size is crucial for the balanced cooking of the bars. It allows them to bake evenly, resulting in a perfectly structured dessert.
- Mixing bowls: Use at least two bowls—one for the brownie batter and another for the cheesecake mixture. This separation helps prevent a chaotic mixing process.
- Parchment paper: Lining your pan ensures effortless release and clean-up. You’ll find it much easier to cut uniform squares when the bars don’t stick.
- Electric mixer: While you can whisk by hand, an electric mixer makes blending the cream cheese and powdered sugar a breeze, achieving that coveted smooth and creamy texture.
- Spatula: You’ll need this handy tool for scraping down the sides of your mixing bowls and for spreading the cheesecake layer evenly.
Before you begin, read through all the steps to understand the process and avoid surprises. Gathering everything and measuring your ingredients ahead of time can make your baking experience seamless and enjoyable.
Ingredients for Cherry Cheesecake Brownie Bars
To create these luscious bars, gather the following ingredients:
- 1 cup unsalted butter: The fat adds richness to the brownie base. You could substitute coconut oil or margarine if you prefer a dairy-free option.
- 2 cups granulated sugar and 1 cup brown sugar: This combo ensures ideal sweetness and moisture. You may swap out brown sugar for additional granulated sugar, but you might miss the slight caramel notes.
- 4 large eggs: Eggs offer structure and stability while contributing to the fudgy texture of the brownies. Flaxseed eggs can serve as a vegan alternative if you’re looking for that option.
- 1 teaspoon vanilla extract: This warm flavor elevates the sweetness. You could also use almond extract for a nutty twist.
- 1 cup all-purpose flour: Flour gives the brownies their structure. For gluten-free alternatives, opt for a good-quality gluten-free baking blend.
- 1 cup unsweetened cocoa powder: The star of the show! It creates that rich, chocolaty base. Carob powder may be a substitute but may alter the flavor profile significantly.
- 1/2 teaspoon salt: Salt enhances flavors and balances sweetness.
- 8 oz cream cheese, softened: This ingredient is the velvety heart of the cheesecake layer. Vegan cream cheese can serve as an excellent substitution.
- 1/2 cup powdered sugar: A touch of sweetness to your cheesecake, gracefully folding into the cream cheese for that silky texture.
- 1 cup cherry pie filling: Use canned or homemade filling. If cherries aren’t your favorite, try raspberry or blueberry pie filling to create a delightful twist.
How to Make Cherry Cheesecake Brownie Bars
Baking this crowd-pleaser may feel daunting, but follow these simple steps, and you’ll create a masterpiece:
-
Preheat your oven to 350°F (175°C). Prepare your 9×13 inch baking pan by lining it with parchment paper, leaving some overhang for easy removal later.
-
In a large mixing bowl, melt the butter. Once melted, whisk in both granulated and brown sugar until the mixture is smooth and shiny, about 2 minutes.
-
Add the eggs one at a time. Mix well after each addition, then stir in the vanilla extract, letting the fragrant aroma lift your spirits.
-
In another bowl, sift together the flour, cocoa powder, and salt. This step eliminates clumps and ensures even distribution. Gradually add the dry ingredients to the wet mixture, mixing gently with a spatula until incorporated.
-
Pour half of the brownie batter into the prepared pan. Use a spatula to smooth it out evenly, creating a sturdy base for the cheesecake layer.
-
In a separate bowl, beat the cream cheese and powdered sugar together until smooth. Achieving a creamy consistency at this stage prevents lumps in the cheesecake layer. Spread it evenly over the brownie base.
-
Spoon the cherry pie filling on top. With a spoon, spread it out gently without disturbing the cheesecake layer beneath. Feel free to swirl it a bit for artistic flair!
-
Pour the remaining brownie batter over the top. You can swirl it with a knife for a marbled effect if desired, creating an enticing visual.
-
Bake for 30-35 minutes. Check for doneness with a toothpick, which should come out clean or with a few fudgy crumbs, not wet batter.
-
Cool completely in the pan. Once cool, use the parchment overhang to lift the bars out before cutting them into squares, revealing those beautiful layers.
Chef’s Notes & Helpful Tips
- Make-ahead tips: These bars can be made a day in advance, allowing flavors to meld beautifully overnight. Store them tightly covered in the refrigerator.
- Cooking alternatives: You can use an air fryer if you’re short on oven space! Just adjust the cooking time to about 20-25 minutes at 325°F (160°C), checking for doneness.
- Customization ideas: Try adding chocolate chips to the brownie batter or topping the finished bars with whipped cream for an indulgent topping. Want to elevate the experience? Serve with a drizzle of chocolate sauce or a scoop of vanilla ice cream.
Common Mistakes to Avoid
- Overmixing the batter: Mixing too vigorously can lead to dense brownies. Blend just until combined, and you’ll ensure a lighter texture.
- Not measuring flour correctly: Too much flour can dry out your bars. Spoon and level it off in your measuring cup rather than scooping directly from the bag.
- Underbaking: Keeping an eye on the bars during the last few minutes of baking is crucial. They may appear soft, but they continue to cook as they cool.
What to Serve With Cherry Cheesecake Brownie Bars
Pair these bars with complimentary flavors to enhance your dessert experience:
- Fresh whipped cream: A dollop adds lightness and creaminess that contrasts beautifully with the dense bars.
- Vanilla ice cream: The coldness provides a perfect temperature balance to the warm bars, making each bite heavenly.
- Fresh strawberries: Their bright flavor and color contrast beautifully with the richness of the bars.
- Chocolate sauce: Drizzle over the top for an extra chocolate kick that will please sweet tooth lovers.
- Coffee or espresso: The bitterness of coffee balances the sweetness delightfully, making each bite even more enjoyable.
- Mint leaves: A refreshing garnish that adds brightness to the dessert both visually and flavor-wise.
- Toasted nuts: Pecans or walnuts sprinkled on top can introduce a delightful crunch and earthy flavor.
Storage & Reheating Instructions
Proper storage extends the life of your treats. Keep any leftovers in an airtight container in the refrigerator, where they will stay fresh for about a week. If you’d like to keep them longer, freeze the bars wrapped tightly in plastic wrap and aluminum foil. They can be stored in the freezer for up to three months.
When it’s time to enjoy them again, simply thaw them in the refrigerator overnight for the best texture. If you prefer a warm treat, pop a square in the microwave for about 15 seconds or into a 350°F (175°C) oven for a few minutes.
Estimated Nutrition Information
Note that the following values are approximate and may vary based on specific ingredients used. Each bar contains:
- Calories: 280
- Fat: 14g
- Carbohydrates: 39g
- Protein: 4g
- Sugar: 25g
Always remember, moderation is key when indulging in sweet treats.
FAQs
-
Can I make these bars gluten-free?
Absolutely! Substitute all-purpose flour with a 1:1 gluten-free baking blend for similar results. -
How can I make the bars ahead of time?
You can bake them a day in advance and store them in the fridge, covered tightly. They taste even better the next day! -
What can I use instead of cherries in the filling?
Feel free to experiment with other fruity fillings like blueberries, raspberries, or even diced strawberries for a delightful twist. -
Can I make these vegan?
For a vegan version, use flaxseed eggs, coconut oil instead of butter, and vegan cream cheese. The bars will still taste fantastic! -
How do I prevent the cheesecake layer from cracking?
Make sure your cream cheese is softened, allowing it to mix more seamlessly. Avoid overbaking as well, as this can lead to cracks once the bars cool.
Conclusion
Cherry Cheesecake Brownie Bars offer the best of both worlds: decadence and nostalgia wrapped up in each delicious square. Whether you prepare them for a special occasion or simply for yourself, this dessert brings a smile and heartwarming satisfaction with every bite. So roll up your sleeves, gather those ingredients, and let the aromas fill your kitchen; an unforgettable treat awaits you that combines creamy, sweet, and tangy elements, creating a heavenly experience to treasure. Don’t wait too long to bake these irresistible bars!
Print
Cherry Cheesecake Brownie Bars
- Prep Time: 15 minutes
- Cook Time: 35 minutes
- Total Time: 50 minutes
- Yield: 16 servings 1x
- Category: Dessert
- Method: Baking
- Cuisine: American
- Diet: Vegetarian
Description
Delightful Cherry Cheesecake Brownie Bars with a rich brownie base, creamy cheesecake layer, and juicy cherry pie filling.
Ingredients
- 1 cup unsalted butter
- 2 cups granulated sugar
- 1 cup brown sugar
- 4 large eggs
- 1 teaspoon vanilla extract
- 1 cup all-purpose flour
- 1 cup unsweetened cocoa powder
- 1/2 teaspoon salt
- 8 oz cream cheese, softened
- 1/2 cup powdered sugar
- 1 cup cherry pie filling
Instructions
- Preheat your oven to 350°F (175°C) and prepare your baking pan.
- Melt the butter in a large mixing bowl and whisk in the granulated and brown sugar until smooth.
- Add the eggs one at a time, mixing well after each addition, then stir in the vanilla extract.
- Sift together the flour, cocoa powder, and salt in another bowl, then gradually add to the wet mixture.
- Pour half of the brownie batter into the prepared pan and smooth it out evenly.
- Beat the cream cheese and powdered sugar together until smooth, then spread it over the brownie base.
- Spoon the cherry pie filling on top and spread it gently.
- Pour the remaining brownie batter over the top, swirling if desired.
- Bake for 30-35 minutes, checking for doneness.
- Cool completely before lifting out and cutting into squares.
Notes
These bars can be made a day in advance for enhanced flavors. Store in the fridge tightly covered.
Nutrition
- Serving Size: 1 bar
- Calories: 280
- Sugar: 25g
- Sodium: 200mg
- Fat: 14g
- Saturated Fat: 8g
- Unsaturated Fat: 6g
- Trans Fat: 0g
- Carbohydrates: 39g
- Fiber: 2g
- Protein: 4g
- Cholesterol: 100mg